13 Microwave Tips Every Home Cook Should Know

We may receive a commission on purchases made from links.
There's no doubt about it; the love Americans have for their microwaves is real. Still, few likely associate the popular appliance with intensely flavorful food. Because microwaves are commonly used to reheat edibles like old takeout, rock-hard frozen dinners, and store-bought butter popcorn, some may struggle to think outside the "box" when it comes to this commonly used kitchen device — that is, until now. In reality, the microwave can be used to cook up more things than you may realize, making this reheating appliance more useful than you'd ever imagine.
In this post, we're unveiling top microwave tips every home cook should know to level up their kitchen game. From ways to make common cooking tasks easier to whipping up amazing homemade indulgences in minutes, the incoming details are sure to change the way you approach your microwave forever.
Ready to heat things up? Join us as we share 13 radiating tips for how best to utilize your microwave.
Easy-to-peel garlic cloves
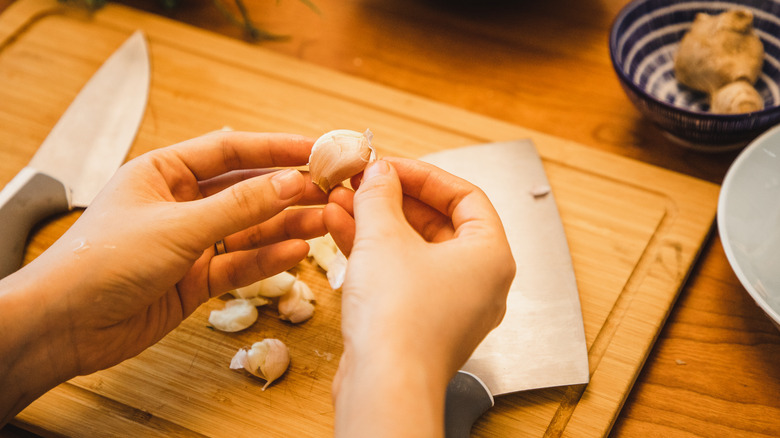
If you've never tried to peel fresh garlic before, consider yourself warned; getting all those pesky papery peels off the clove ain't easy. And though there are several ways to make peeling garlic cloves easier, using your microwave is one that's less talked about.
So, here's the deal. Take however many garlic cloves you want to peel (or even the whole head) and place them on a microwave-safe plate. Nuke the garlic cloves until slightly warmed, and voilà — those papery peels should slide right off.
Bear in mind that while most people claim you should microwave your garlic cloves for at least 20 seconds, some, like this poster on Reddit, suggest that this cook time might be a little too long, especially if you're only heating a few garlic cloves at a time. Experiment with the timing to find what works for you — apparently, garlic cloves that spend too much time in the microwave are subject to explosion, leaving you with a stinky, garlicky mess.
Effortless citrus juice
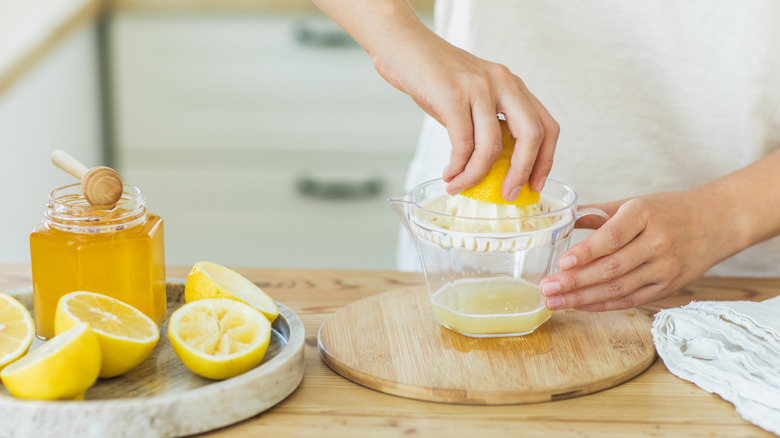
If you love using citrus in recipes but hate the work you have to put in to extract its juices, then the next microwave tip is for you. Making orange juice or lemonade usually requires the juice of fresh fruit, and though there are great, easy-to-use juicers out there that are certainly up for the challenge, your microwave is an appliance that will help to yield more juice than you might think.
To make juicing citrus fruits easier using a microwave, try heating the fruit for seven to 10 seconds before rolling it with your hands across your counter or other flat surface. Be sure to use a good amount of pressure when rolling, as this breaks down the internal fibers and helps increase the amount of juice the fruit will yield.
Once finished, immediately cut open the fruit, and juice it as you normally would. Enjoy an abundance of citrusy goodness to be used in anything from fresh juices to delicious dressings. It's all good!
Microwaved corn on the cob

Did you know you can cook corn on the cob in the microwave? Neither did we. Interestingly, microwaved corn cob is a thing, and those of us who are just finding out are a little behind the curve. As it turns out, whipping up microwaved corn on the cob is shockingly easy, and guess what? You don't even have to shuck the corn before cooking.
To use your microwave to cook corn, simply place the entire corn cob in your microwave — husks and all. Microwave the corn for anywhere between two and four-and-a-half minutes, depending on your microwave and the size of your corn cobs. Carefully remove the hot corn and cut off the stem, including the first row of corn from the bottom end.
Once cut, you should be able to easily slide the corn out of the husk to be enjoyed with butter, salt, and pepper. Cool, huh?
Fresh bread and butter pickles

Pickle fans, listen up; this one's for you. We all know there are some disastrous pickle options out there in grocery-land, making the idea of making your own at home more plausible. Though homemade pickles are traditionally made over the stove, you can get surprisingly similar results using a microwave. With just a few simple ingredients, you'll achieve the pickled flavor you love, even if it does take a little longer than expected to achieve vinegary perfection.
To start the process, you'll need cucumbers, sugar, distilled vinegar (or apple cider vinegar), onion, and a few spices — mustard seed, celery seed, turmeric, and salt all work well. Thinly slice your cucumbers and onion and place them into a microwave-safe bowl. To your veggies, add sugar and vinegar before sprinkling your desired flavorings on top. Microwave the mixture for two to three minutes before stirring and placing it back in the microwave for another couple minutes. Stir again before giving it one last blast at about two to three minutes, for a total cook time of seven or eight minutes.
Once finished, transfer the pickles along with their juices into a sterilized jar or container before placing them in the fridge. The pickles will develop more flavor as they sit. Yum!
Dried herbs

If you find yourself alternating between dried and fresh herbs for various recipes, you may find this microwave hack quite helpful. Rather than allowing your fresh herbs to go to waste, try placing them in the microwave to extend their shelf life.
Drying herbs in a microwave is simple and can even help herbs retain their color, flavor, and aroma better than traditional drying methods. To do it, simply place the herbs between two paper towels; one beneath and another on top. Be careful not to use recycled paper towels as these can, at times, contain small pieces of metal that may cause combustion. Once assembled, nuke the herbs anywhere between 40 seconds and a minute before checking the results.
Once the initial cook time has passed, you should continue to microwave the herbs at small intervals (about 20 seconds each) until the herbs crumble when bent. Bear in mind that resilient herbs may be able to withstand longer microwave times, while delicate herbs may not. After the herbs have dried, use them as is, or grind them into a fine powder for use in seasonings, rubs, dressings, and other recipes.
Homemade potato chips

Everyone knows that eating potato chips straight out of the bag is the convenient way to enjoy a salty snack, but if you're in the mood for a healthier option that's no less delicious, then you'll love the next microwave tip. Believe it or not, you can easily make potato chips in the microwave using potatoes, oil, salt, and parchment paper.
Start by very thinly slicing your potatoes with a mandolin, about ⅛-inch thick. Once sliced, place them in a bowl of cold water for 15 to 20 minutes before rinsing and drying well. Place your dried and sliced potatoes on a plate lined with oiled parchment paper. Brush or spritz oil on top of the potatoes (we love this TrendPlain Oil Sprayer found on Amazon) before microwaving for around three minutes. Flip the chips using a spatula and cook an additional four minutes.
Keep a close eye on your chips to ensure they aren't burning as you go; depending on how many you're cooking at once, microwave times may vary. Once the chips have finished cooking, give them a light dusting of salt along with whatever other spices suit your fancy. Enjoy your freshly made chips alongside a cold lunch sammie or all on their own. Yum!
Microwave chocolate ganache
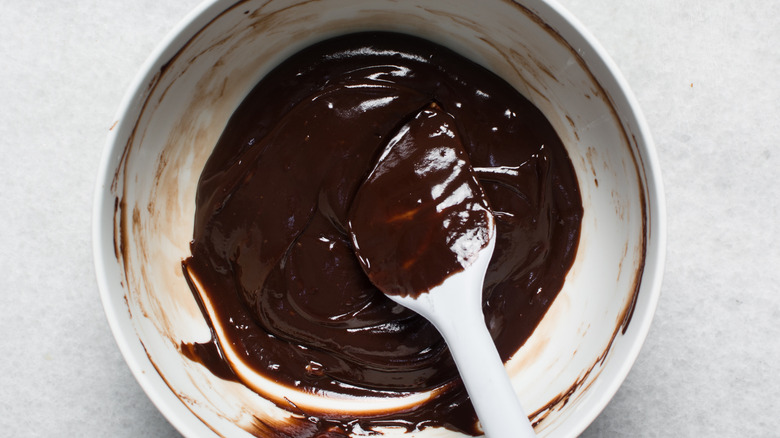
We know, we know. Making homemade chocolate ganache is already pretty simple and doesn't necessarily require a more expedient strategy. Even so, if you hate doing dishes as much as we do, you'll likely still appreciate this easy and pot-less approach to the recipe.
As you probably already know, chocolate ganache is a rich, decadent, and silky smooth "sauce" that usually consists of only a few ingredients, namely, chocolate and cream. Because of its simple composition, this thick and chocolatey treat is shockingly easy to make in the microwave. To pull it off, pour 6 ounces of chocolate chips into a microwave-safe bowl along with 4 ounces of cream. Nuke the mixture in short bursts of 30 seconds each until the chocolate is melted.
From there, remove your ganache and whisk vigorously until smooth and lump-free. The results? Utter deliciousness to be enjoyed on its own or as part of your favorite dessert.
Browned butter
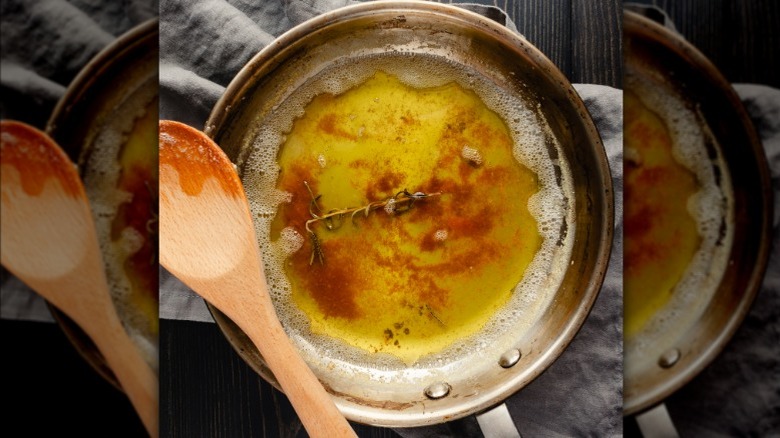
If you haven't had the pleasure of sampling brown butter, consider this your opportunity. Brown butter is exactly what it sounds like – it is quite simply butter that's been cooked until brown. Interestingly, this type of butter has a nutty flavor that's unique from the regular version, which is why people often use it as a substitute in familiar meals and treats that contain traditional butter. The downside? Using brown butter means you'll also have to cook it, which usually involves standing over the stove to ensure it doesn't burn. And though admittedly easy to make, not all of us wish to spend precious time staring at a pot.
Thankfully, using the microwave to cook brown butter requires very little supervision. When browning butter in the microwave, use between 4 tablespoons and two full sticks. Place the butter in a microwave-safe dish along with a lid or microwave-compliant covering, such as this Runzi collapsible food cover, to prevent splatter. Aim to microwave butter that's less than a full stick at two minutes and again at 30-second intervals until browned. If you're going for two sticks of butter, set the microwave timer for three to four minutes.
Once browned, feel free to use your butter for whatever you desire. We especially like its flavor in cookies, pancakes, popcorn, and veggies.
Omelet-in-a-Mug
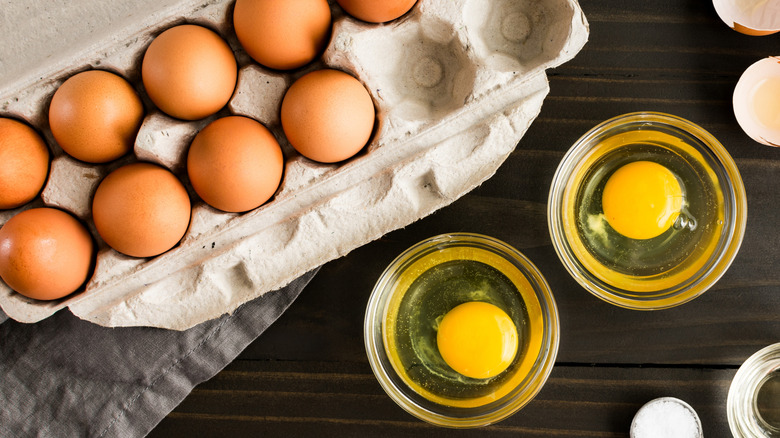
Whether you're up for an early morning work meeting or on your way out for a brisk jog, having a warm, delicious breakfast on hand is always welcome. Interestingly, you can easily whip up a satisfying omelet in your microwave for a quick and easy way to enjoy a morning meal.
To make an omelet in the microwave, first select a mug that's microwave-safe. Mugs that have cracks or chips in them, are made of metal, or are handmade aren't recommended for microwave mug recipes. Once you've selected an appropriate mug, spray it with cooking oil and add a couple of eggs and a splash of milk. Beat the mixture with a fork before tossing in your choice of finely diced veggies and cheese. Feel free to add meat to the mix as well; just make sure it is pre-cooked for safety.
Once assembled, stir the egg mixture until well incorporated. Microwave at 30-second intervals, giving it a mix between each break. Continue to microwave until the eggs have set, usually around a couple of minutes. Remember that because microwave performance can vary, you may need to experiment a bit with cook times.
Homemade microwave rice
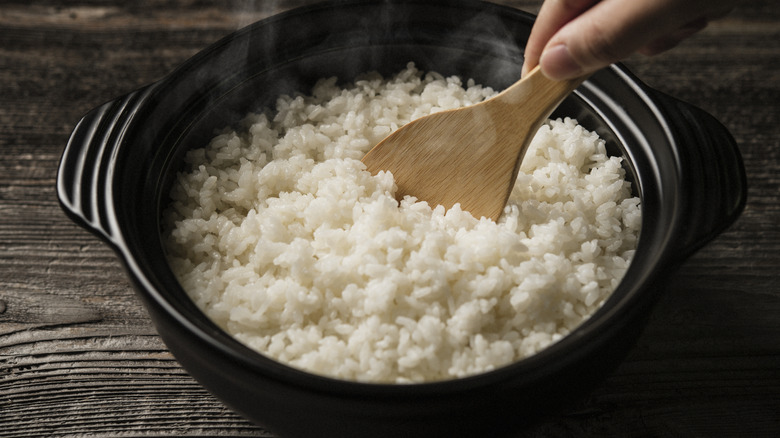
We've all seen microwavable bags of rice on store shelves, but to be honest, they may not be worth the buy. It's just as easy to make microwaved rice from scratch, and it's a lot cheaper to boot.
To cook rice in a microwave, you'll need kitchenware similar to this KitchenAid Vitrified Stoneware Round Baker with a lid, as well as a microwave-safe plate to catch any overflow. To your dish, add one part rice with two parts hot water along with a knob of butter, dash of salt, and whatever other awesome ingredients you use to season bland rice. Stir the mixture and apply the lid. Place the dish on a plate and microwave for about five minutes before removing and stirring again. Replace the lid and microwave for about 15 minutes, or until most of the water is absorbed. Carefully fluff with a fork, and serve alongside this tantalizing chicken teriyaki or another deliciously savory entrée.
Baking a mini mug cake
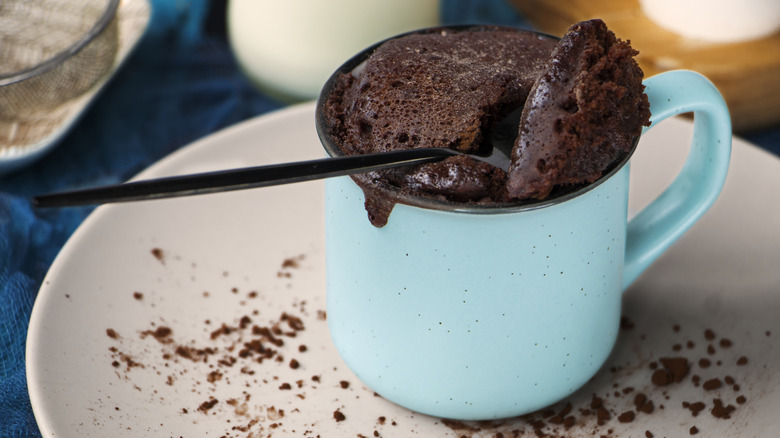
If you've got a hankering for something sweet but don't want to break out all of your baking supplies, a mini mug cake might be just what you need. Mini mug cakes have grown in popularity in recent years, with some popular cake brands even offering their own versions of this sweet sensation on grocery store shelves. Thankfully, a mini mug cake is easy enough to make at home and requires minimal equipment, meaning you can enjoy all the cake flavor you love without having to endure the mess often associated with baking.
Before getting started, you'll want to make sure you have what you need. Like when making an omelet in a mug, you'll want to ensure the cup you're using is microwave-safe and large enough before getting started. Once ready, add flour to your mug, along with sugar, baking powder, salt, butter, milk, and vanilla extract. Feel free to toss in other fun mix-ins — sprinkles, Nutella (or any other type of store-bought hazelnut spread), chocolate chips, nuts, and cinnamon serve as lovely additions.
Once combined, microwave your cake batter anywhere between 60 and 90 seconds, or until the cake has set. Allow the final dessert to rest for a couple of minutes before digging in. Delish!
Softer and creamier ice cream
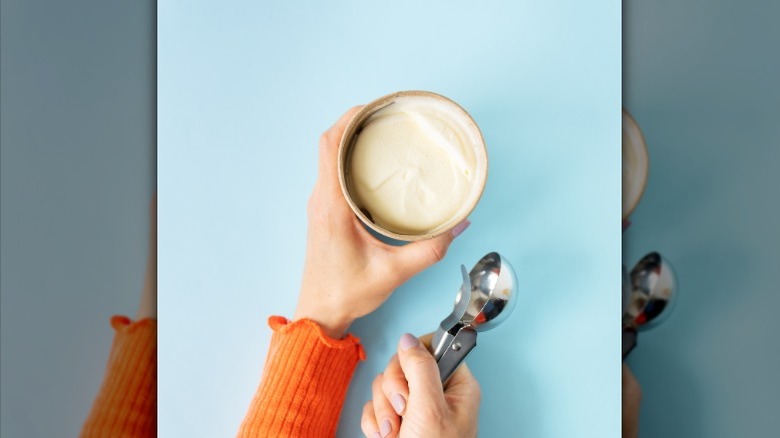
If putting your ice cream in the microwave sounds a bit nutty, we understand your concern. Truth be told, there's definitely a right and wrong way to go about microwaving ice cream, but doing it correctly can deliver utterly satisfying results.
The primary purpose of microwaving your ice cream is usually two-fold: to achieve a "meltier" consistency, and to enhance its scoopability. Now for the details. If all you're looking to do is make your ice cream soft and creamy, we'd recommend scooping your ice cream into a bowl before nuking it for about five to 10 seconds, tops. We won't spend time explaining what might happen if you microwave your ice cream too long — the results are obvious.
As for microwaving ice cream for scoopability, well, that's another subject entirely. If you want to soften the entire ice cream carton without destroying it, you should manually set your microwave to 50% power. "Cook" the ice cream between 10 seconds and a minute. Be sure to check it about every 10 seconds or so to make sure your ice cream hasn't turned into a melted mess — and stop microwaving once your scoop manages to glide through the ice cream's surface with ease.
Toasting nuts

There's nothing like warm toasted nuts enjoyed as part of your morning oatmeal or a late-night snack. And though tossing nuts into a sizzling skillet or onto a baking sheet sounds simple enough, these methods have their drawbacks. Because toasting nuts over the stove can sometimes lead to uneven browning, an uncooked center, and even unwelcome charring, babysitting the nuts as they cook can turn into a frustrating experience. Using your microwave not only can make things simpler, but also eliminates the hassle of having to wash dishes afterward — and who can argue with that?
To toast nuts in the microwave, you'll first want to coat them in a bit of oil. The best way to do this is with an oil spritzer using a neutral-flavored oil like canola. From there, arrange your nuts in a single layer on a microwave-safe plate and warm them up.
Generally speaking, you'll want to "toast" your nuts in the microwave for anywhere between three to eight minutes, but only at one-minute intervals. This will allow you to check on the nuts as they cook; just be sure to give them a stir to ensure even cooking on all sides. Once the nuts are aromatic and have developed some color, feel free to enjoy.